Certified FileMaker 9 Developer
www.dwaynewright.com
info@dwaynewright.com
Here is a step by step description of creating a report that has a sub-summary breakdown feature. While I am writing this content, I’m going to add a new report to the 2.3 version of my InBizness SOHO product. I want to see a breakdown of client records by the state they reside within. I want to see a report total of each clients activity within the solution. I have to admit, I almost never use the report assistant to create my reports. I tend to create them from blank layouts or duplicate/tweak an existing report for my needs. However, that will be an article for another time.
 Step 1 - Before we get started, you will want to work with an off-line backup copy of your database, make sure you have the fields you need for the report and possibly clean your data.
 As odd as it may sound, you need to make sure you have the fields created you want to use in your report. Otherwise, you will need to cancel the report, create the fields and then come back again. So in the report that I’m going to create, I need to have the billing state information and the summary total fields I’m going to report upon. Another thing you can do help yourself out is clean your data. As I was typing this, I realized the example data I had in SOHO may have empty fields in the billing address, so I did some targeted finds and cleaned up the data.
Step 2 - Next we need to put FileMaker into layout mode. When you enter into layout mode, you will notice that you now have a Layout menu option. From here, select to create a new layout by selecting the first option of New Layout / Report. In the following dialog box, give your report a name, select the Columnar list / report option and click the Next button.
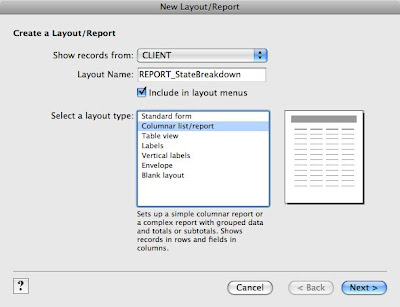 Figure 1: Be sure to check the second option of Columnar List / Report
Step 3 - The next window in the assistant allows you to create a simple list or a report with grouped data. The grouped data option uses the sub-summary layout part that we discussed briefly earlier. This is the option we want to select. So from here, select the second option of Report With Grouped Data. There are two options to this setting. The Include Subtotals is used to allow you to see totals by the break field. For example, we are going to use the State field as our break field in this example. So we will need to sort by this field and then the layout will show us the totals for each state. The next option is to Include Grand Totals. We will want to select this option as well.
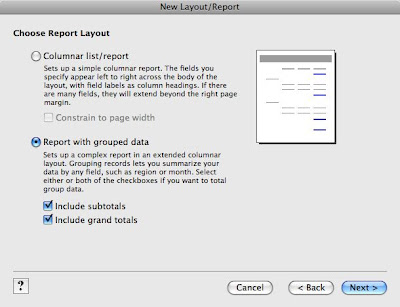 Figure 2: Here are the settings I selected for my report.
Step 4 - The next window in the assistant allows you to specify the fields you want in the layout. You can select the fields you want from the list on the left, click the move button and the field will appear in the list on the right. The list on the right reflects the fields that will be on the layout in the order they will appear. You can move these fields up and down in the list to change the order in which they will appear. We should also mention that you can use fields from a valid relationship as well in this layout. The related fields can be found from the pop down menu right about the left hand list.
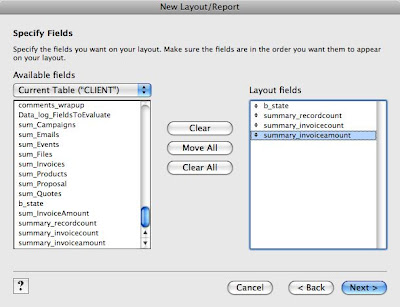 Figure 3: Here are the settings I selected for my report.
Step 5 - The next window will allow you to choose what field you want to group the data with. This is our break field, which is also how the found set will need to be sorted. You can have multiple fields for the break field but the more you add ... the more busy the report will appear. Some folks love busy reports with data sliced and diced ten different ways to Sunday. Other folks find busy reports confusing and lacking a particular focus.
For our example, we are only going to include the State field.
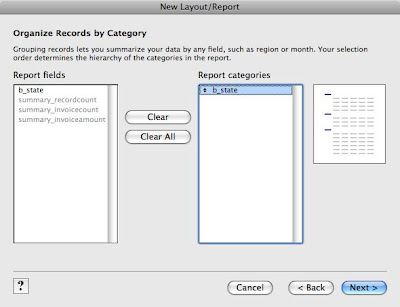 Figure 4: Here are the settings I selected for my report.
Step 6 - The next window will allow you to choose a sort order for the report. This is critical for sub-summary reports and is best attached to a script. FileMaker will not sort a found set of record by simply going to a particular layout. Since our break field is the State field, we are going to specify it as the primary sort field. You can have other sorts after your break field setting. This will simply sort the records in the Body layout part.
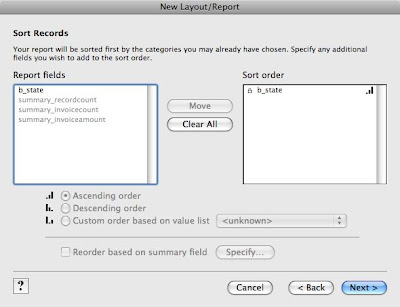 Figure 5: Here are the settings I selected for my report.
Step 7 - The next window is used for you to specify your subtotal fields. This is where our summary field will play a part. The dialog box has 3 pop down menus at the top. The first allows you to select the field for the summary part. The second will show the field you want to summarize by and the last option is were you want the sub-summary to appear ( above or below the body of records it summaries). After you have made your selections, you click the button Add Subtotal for it to be recorded in the section below these settings.
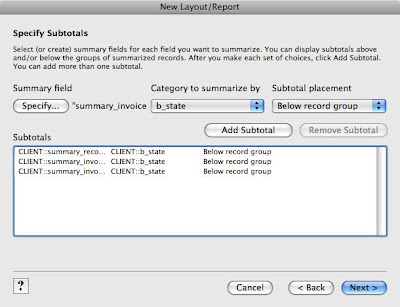 Figure 6: Here are the settings I selected for my report.
Step 8 - The next window is used for you to specify your grand total section. FileMaker will do a pretty good job of assuming what you want here. Odd as it may sound, I’ve never seen this dialog until now. I’m going to take a shot at the settings that seem to make sense and rely on my ability to tweak this as needed after the fact.
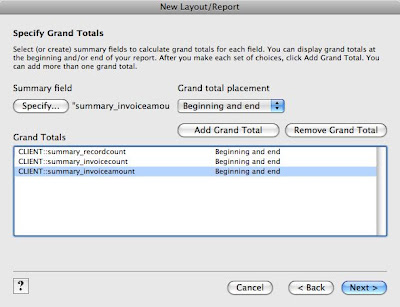 Figure 7: Here are the settings I selected for my report.
Step 9 - The next window is used for you to choose one of the provided FileMaker themes. Some of these themes may seem to be a little odd to you and not that business like. However, it should be noted that some of these themes look great when used with the Instant Publishing. I tend to select the most plain theme because I want to customize it for my needs.
Step 10 - The next window is very cool. It allows you to show information in the header and / or the footer that tell the user something about the list / report. Some of this information can be seen when you are viewing the layout in browse mode and some of it can only be seen when in print preview or when printed out.
Again, I’m going to understate my needs here and tweak it afterwards, I’m going to add the name of the report of the upper left, the current date in the upper right and the page number in the bottom right.
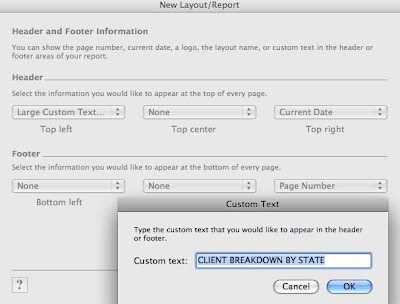 Figure 8: Here are the settings I selected for my report.
Step 11 - The next window allows you to create a script on the fly for going to this layout. This can be very useful for complicated reports that have multiple steps. The script that is automatically created for you is very basic. I am not going to create a report at this time. Many of my reports are gathered into one script and broken up by a script parameter. This is more of a helper option and will not affect your report overall.
Step 12 - The final step asks you what mode you want to be in when the assistant ends. You can be in preview mode for those complicated reports using sub-summary parts. However, most of the time you will want to be in layout mode. This allows you to add any customizations you want on the newly created report.
Step 13 - I decided to see my report in layout mode and it is not even close to what I want. However, I can tweak it to meet my needs.
 Figure 9: Here is what I got when I got into layout mode for this report.
 Step 14 - So I obviously made selections in the report assistant process that I did not want to make. This happens and I thought it was important to share this with you. This happens and it is no big deal because I will tweak the report. Here are the tweaks I made ...
- deleted the first leading grand summary layout part
- moved the summary fields from the body up to the sub-summary part
- deleted the body and the sub-summary part following it
- moved the summary fields so they were below each other
- by default, FileMaker labels the fields with the field names and I changed those labels to make more sense on the report.
- made the report total fields aligned to the right, made the invoice total a number format field, tweaked the footer part for display
 Figure 10: Although I will tweak it more over time, here is what the layout looked like when the above tweaks were complete.
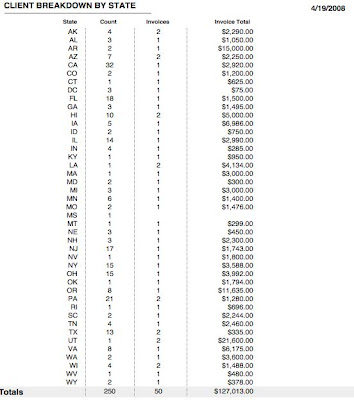 Figure 11: Here is a quick look at the browse view of the created report.
=
More info about the author and FileMaker in general, contact me at info@dwaynewright.com.
© 2008 - Dwayne Wright - dwaynewright.com
The material on this document is offered AS IS. There is NO REPRESENTATION OR WARRANTY, expressed or implied, nor does any other contributor to this document. WARRANTIES OF MERCHANT ABILITY AND FITNESS FOR A PARTICULAR PURPOSE ARE EXPRESSLY DISCLAIMED. Consequential and incidental damages are expressly excluded. FileMaker Pro is the registered trademark of FileMaker Inc.


No comments:
Post a Comment