Tuesday, April 29, 2008

Accounts And Passwords For InBizness SOHO Version 2.3

From Dwayne Wright - Certified FileMaker 9 Developer
www.dwaynewright.com
info@dwaynewright.com
TWITTER: dwaynewright

With the release of version 2.3 of InBizness SOHO, I made some tweaks to how the online demo works. Basically, you can sign into any of the accounts by using a supplied launcher file. The launcher file has a number of buttons that will log you into the demo by using the account name and password.


As of version 2.3, all the privilege sets have the same security settings. However, the records will be tagged with the name you signed into SOHO with to open the file. As I add more modules, you will start to see the differences in the different accounts and I will document was accounts can do what.

Accounts And Passwords For InBizness SOHO Version 2.3 have the following privilege sets ...

User
Owner
Manager
Admin
Sales
Data Entry
Customer Service
Information Tech

All the accounts are configured the same with full record access, layouts / value lists / scripts are view or execute only. As I mentioned earlier, this will likely change with later versions.


=
More info about the author and FileMaker in general, contact me at info@dwaynewright.com.

© 2008 - Dwayne Wright - dwaynewright.com

The material on this document is offered AS IS. There is NO REPRESENTATION OR WARRANTY, expressed or implied, nor does any other contributor to this document. WARRANTIES OF MERCHANT ABILITY AND FITNESS FOR A PARTICULAR PURPOSE ARE EXPRESSLY DISCLAIMED. Consequential and incidental damages are expressly excluded. FileMaker Pro is the registered trademark of FileMaker Inc.

Friday, April 25, 2008

Introduction To The Office Software Module

From Dwayne Wright - Certified FileMaker 9 Developer
www.dwaynewright.com
info@dwaynewright.com
TWITTER: dwaynewright

A place that allows you to quickly enter in the software with license information you are using. You can enter information such as purchase date, related vendor, access codes and even linked files!


Key Features Of The Office Software Module
- Ability to record office equipment records
- Ability to link to vendor records
- Ability to link to media file records
=
More info about the author and FileMaker in general, contact me at info@dwaynewright.com.

© 2008 - Dwayne Wright - dwaynewright.com

The material on this document is offered AS IS. There is NO REPRESENTATION OR WARRANTY, expressed or implied, nor does any other contributor to this document. WARRANTIES OF MERCHANT ABILITY AND FITNESS FOR A PARTICULAR PURPOSE ARE EXPRESSLY DISCLAIMED. Consequential and incidental damages are expressly excluded. FileMaker Pro is the registered trademark of FileMaker Inc.

Introduction To The Office Equipment Module

From Dwayne Wright - Certified FileMaker 9 Developer
www.dwaynewright.com
info@dwaynewright.com
TWITTER: dwaynewright

A place that allows you to quickly enter in the office equipment you are using. You can enter information such as purchase date, related vendor, extended warranty information and even linked files!


Key Features Of The Office Equipment Module
- Ability to record office equipment records
- Ability to link to vendor records
- Ability to link to media file records
=
More info about the author and FileMaker in general, contact me at info@dwaynewright.com.

© 2008 - Dwayne Wright - dwaynewright.com

The material on this document is offered AS IS. There is NO REPRESENTATION OR WARRANTY, expressed or implied, nor does any other contributor to this document. WARRANTIES OF MERCHANT ABILITY AND FITNESS FOR A PARTICULAR PURPOSE ARE EXPRESSLY DISCLAIMED. Consequential and incidental damages are expressly excluded. FileMaker Pro is the registered trademark of FileMaker Inc.

Introduction To The Vendor Bill Module

From Dwayne Wright - Certified FileMaker 9 Developer
www.dwaynewright.com
info@dwaynewright.com
TWITTER: dwaynewright

The vendor invoices module tracks all invoices linked to your purchase orders and can be linked to both vendor and inventory records. You can also link a vendor bill to a finance record by paying the bill from a finance account and even record the payment transaction on the fly!


Key Features Of The Vendor Bill Module
- Ability to create bills for purchases
- Ability to link payment information to finances
- Ability to setup alternate payment addresses
- Ability to link bill to media files
- Ability to link order to purchase orders
=
More info about the author and FileMaker in general, contact me at info@dwaynewright.com.

© 2008 - Dwayne Wright - dwaynewright.com

The material on this document is offered AS IS. There is NO REPRESENTATION OR WARRANTY, expressed or implied, nor does any other contributor to this document. WARRANTIES OF MERCHANT ABILITY AND FITNESS FOR A PARTICULAR PURPOSE ARE EXPRESSLY DISCLAIMED. Consequential and incidental damages are expressly excluded. FileMaker Pro is the registered trademark of FileMaker Inc.

Introduction To The Purchase Module

From Dwayne Wright - Certified FileMaker 9 Developer
www.dwaynewright.com
info@dwaynewright.com
TWITTER: dwaynewright

This module allows you to create purchase order, a recorded commitment to purchase goods or services from a vendor. Within InBizness SOHO, a purchase order is linked to a vendor record and the line items on the purchase order can be linked to inventory records. Purchase Order records can also be linked to Vendor Bill records to see related payment history for the invoice.


Key Features Of The Purchase Order Module
- Ability to create orders to products to purchase
- ability setup drop ship addresses for delivery
- Ability to setup alternate payment addresses
- Ability to link order to media files
- Ability to link order to a vendor bill
- Ability to receive products from purchases
=
More info about the author and FileMaker in general, contact me at info@dwaynewright.com.

© 2008 - Dwayne Wright - dwaynewright.com

The material on this document is offered AS IS. There is NO REPRESENTATION OR WARRANTY, expressed or implied, nor does any other contributor to this document. WARRANTIES OF MERCHANT ABILITY AND FITNESS FOR A PARTICULAR PURPOSE ARE EXPRESSLY DISCLAIMED. Consequential and incidental damages are expressly excluded. FileMaker Pro is the registered trademark of FileMaker Inc.

Introduction To The Proposal Module

From Dwayne Wright - Certified FileMaker 9 Developer
www.dwaynewright.com
info@dwaynewright.com
TWITTER: dwaynewright

You can enter in the various aspects of a proposal into regular fields. You have an area that allows you to create individual milestones with a low and high bid on the time. These milestones can be sort and the proposed charge is calculated automatically. Finally, you click one button and the entire proposal is compiled and ready for printing or emailing!


Key Features Of The Proposal Module
- Ability to create milestones for proposals
- ability to link products to purchase
- Ability to create linked statements and terms
- Ability to link proposals to media files
- Ability to convert to a quote
- Ability to convert to a campaign
=
More info about the author and FileMaker in general, contact me at info@dwaynewright.com.

© 2008 - Dwayne Wright - dwaynewright.com

The material on this document is offered AS IS. There is NO REPRESENTATION OR WARRANTY, expressed or implied, nor does any other contributor to this document. WARRANTIES OF MERCHANT ABILITY AND FITNESS FOR A PARTICULAR PURPOSE ARE EXPRESSLY DISCLAIMED. Consequential and incidental damages are expressly excluded. FileMaker Pro is the registered trademark of FileMaker Inc.

Introduction To The Quotes Module

From Dwayne Wright - Certified FileMaker 9 Developer
www.dwaynewright.com
info@dwaynewright.com
TWITTER: dwaynewright

The quote module is basically a lite version of the invoice module. It allows you to create a number of quotes for the client to look at. When the client approves one of the quotes, you can click a single button and all the details of the quote are added to a new invoice. Quotes are also linked to the client file. So you can see all the quotes you have done for a client.


Key Features Of The Quote Module
- Ability to quote products and services
- Ability to email out qutoes
- Ability to link invoices to media files
- Ability to convert to an invoice
- Ability to duplicate a quote with line items
=
More info about the author and FileMaker in general, contact me at info@dwaynewright.com.

© 2008 - Dwayne Wright - dwaynewright.com

The material on this document is offered AS IS. There is NO REPRESENTATION OR WARRANTY, expressed or implied, nor does any other contributor to this document. WARRANTIES OF MERCHANT ABILITY AND FITNESS FOR A PARTICULAR PURPOSE ARE EXPRESSLY DISCLAIMED. Consequential and incidental damages are expressly excluded. FileMaker Pro is the registered trademark of FileMaker Inc.

Introduction To The Staff Module

From Dwayne Wright - Certified FileMaker 9 Developer
www.dwaynewright.com
info@dwaynewright.com
TWITTER: dwaynewright

The staff module was designed to help virtually any record from any module to a staff member record. The staff member record is also designed to help simplify the setting of security throughout the system.


When a user tried to access InBizness SOHO, there are asked for a user name and password. This information is linked to the staff module and InBizness SOHO keeps track of the user information. Each new record in almost all modules is flagged with the staff member who created it.

There is a lot of room for growth with the staff module to become a dashboard for all staff member interactions. There are tabs to help see staff member links to events, emails, equipment, software and mileage records.

Key Features Of The Staff Module
- Ability to stored scanned staff signatures
- Ability to create log in credentials
- Ability to create and link time card records
- Ability to link to event & email records
- Link to equipment and software being used
- Quickly enter in mileage reimbursements
- Record staff degrees and performance evals
- Ability to link to media file records
=
More info about the author and FileMaker in general, contact me at info@dwaynewright.com.

© 2008 - Dwayne Wright - dwaynewright.com

The material on this document is offered AS IS. There is NO REPRESENTATION OR WARRANTY, expressed or implied, nor does any other contributor to this document. WARRANTIES OF MERCHANT ABILITY AND FITNESS FOR A PARTICULAR PURPOSE ARE EXPRESSLY DISCLAIMED. Consequential and incidental damages are expressly excluded. FileMaker Pro is the registered trademark of FileMaker Inc.

Introduction To The Finance Module

From Dwayne Wright - Certified FileMaker 9 Developer
www.dwaynewright.com
info@dwaynewright.com
TWITTER: dwaynewright

Most of us have used some version of a money management software package. I’ve used Quicken for years but I wanted more control, like to have my financial transactions to be linkable to my other business operations. As with most “shrink wrapped” software packages, your ability to customize screens, fields and operations can be very limited. In some cases, it appears that you have to adapt your business to fit the software package and it really should be the other way around. That is one of the many things that is so great about a solution designed with FileMaker Pro! The finance module currently has three main tabs. The first is transactions, which allow you to see all the transactions for an account. The second tab is for accounts such as checking accounts, credit cards, savings accounts, 401K accounts and the like. The third tab is for calculating a budget.


The Finance module allows you to enter in financial transactions that are linked to a particular account. Across the top of the screen, you will see a collection of buttons used to work with the current account. Here is a listing of the buttons and a quick description of what they do.

New Transaction - creates a regular new transaction for the account you are browsing. This transaction can be a withdrawal or a deposit of any kind.

New Check - creates a new check withdrawal transaction for the account you are currently browsing.

ATM Withdrawal - creates a new withdrawal record and automatically flags it as an ATM transaction for the account you are currently browsing.

Pre Authorized Credit - creates a pre authorized deposit record for the current account. I tend to use this to record successful batch deposit transactions.

Internet Payment - allows you to create a transaction (normally a payment) and flag it as an internet related account

New Deposit - creates a new deposit records for the currently browsed account.

Add Bank Fee - create a new withdrawal record and flags it as a bank fee.

Below the bank of transaction specific buttons is the account information section. This is the most basic information of an account such as the account name, type, main phone number and the accounts current balance. This view of basic account information is generally all you need as you work with a set of transactions. There is more detailed account record information can be found in the second tab, aptly named Accounts.

The lower tab panels hold the most important information for the entire finance transaction module. Here you can see the actual transactions that make up an account. You can see the Transaction Date, Check #, Description, Deduction or Deposit, Reconcile Cleared Indicator and Tax Type fields. There is a magnifying glass icon on one side of each listed record (to view the specifics of that transaction) and a trash can icon on the far right side of each transaction (to delete it).

Key Features Of The Finance Module
- Ability to link to multiple transactions
- Common transactions are button activated
- Ability to see not reconciled transactions
=
More info about the author and FileMaker in general, contact me at info@dwaynewright.com.

© 2008 - Dwayne Wright - dwaynewright.com

The material on this document is offered AS IS. There is NO REPRESENTATION OR WARRANTY, expressed or implied, nor does any other contributor to this document. WARRANTIES OF MERCHANT ABILITY AND FITNESS FOR A PARTICULAR PURPOSE ARE EXPRESSLY DISCLAIMED. Consequential and incidental damages are expressly excluded. FileMaker Pro is the registered trademark of FileMaker Inc.

Introduction To The Email Module

From Dwayne Wright - Certified FileMaker 9 Developer
www.dwaynewright.com
info@dwaynewright.com
TWITTER: dwaynewright

The email module is used to store records for incoming and outgoing e-mails. Each record in the email table can be linked to the other main modules such as clients, campaigns and vendors. At the point that I’m writing this manual, the email module is under developed, which I thought would be better than over developed.


There is a lot of potential in this module and chances are it will need to be customized for each business entities unique ways of working with email. This version of InBizness SOHO uses the FileMaker Send Mail script step to send out e-mails and does not support any automatic way to store incoming e-mails. There are third party products that enable FileMaker to automatically accept incoming email messages and can send email messages without the use of compatible mail programs. Since InBizness SOHO is a FileMaker product, InBizness SOHO is compatible with these products as well. Future versions of this product will likely utilize some form of additional technology to better handle incoming and outgoing email products. You don’t have to wait for that however, you can build your own threading system using your accomplished FileMaker design skills.

Key Features Of The Email Module
- Ability to link to multiple modules
- Automatically links new records to current account
=
More info about the author and FileMaker in general, contact me at info@dwaynewright.com.

© 2008 - Dwayne Wright - dwaynewright.com

The material on this document is offered AS IS. There is NO REPRESENTATION OR WARRANTY, expressed or implied, nor does any other contributor to this document. WARRANTIES OF MERCHANT ABILITY AND FITNESS FOR A PARTICULAR PURPOSE ARE EXPRESSLY DISCLAIMED. Consequential and incidental damages are expressly excluded. FileMaker Pro is the registered trademark of FileMaker Inc.

Introduction To The Vendors Module

From Dwayne Wright - Certified FileMaker 9 Developer
www.dwaynewright.com
info@dwaynewright.com
TWITTER: dwaynewright

This module contains records of the companies which products or services are purchased from and links to where they interact with other InBizness modules. You can use this to track purchases of inventory supplies, purchases of office supplies, tracking of equipment warranty and (my personal favorite) the tracking of conversations with technical support and customer service representatives!


Besides the general information about the vendor, you can find multiple tab panels divided into sections, which include Linked Files, Emails, Transactions, Purchase Orders and Office Equipment records.

Vendor Address Information is used to store the basic contact information about a vendor including physical address, contact person, phone number, fax number, email address and web site. Next to the email and web fields are small buttons that work with that fields information. Clicking the small envelope icon next to the email address field will create a new email linked to that email address. The magnifying glass icon next to the web site information will take you to that web address within your default internet browser.

Vendor records can be linked to finance transaction, the finance module can be used to track checks written or credit card purchases. The account number field is the account number the vendor has given to you. The type field allows you to report on transactions like utilities or inventory. The tax type field is like the type field except the value list for that field matches descriptions in a tax deduction form. The status field allows you to mark if a vendor is active, inactive or no longer in business.

Key Features Of The Vendors Module
- Ability to link to multiple contacts
- Ability to link to emails and events
- Ability to link to finance transaction
- Ability to link to purchase orders
- Ability to link to office equipment
- Ability to link to multiple media files
=
More info about the author and FileMaker in general, contact me at info@dwaynewright.com.

© 2008 - Dwayne Wright - dwaynewright.com

The material on this document is offered AS IS. There is NO REPRESENTATION OR WARRANTY, expressed or implied, nor does any other contributor to this document. WARRANTIES OF MERCHANT ABILITY AND FITNESS FOR A PARTICULAR PURPOSE ARE EXPRESSLY DISCLAIMED. Consequential and incidental damages are expressly excluded. FileMaker Pro is the registered trademark of FileMaker Inc.

Introduction To The Campaigns Module

From Dwayne Wright - Certified FileMaker 9 Developer
www.dwaynewright.com
info@dwaynewright.com
TWITTER: dwaynewright

A campaign is another name for a project. Records within the campaign module can include a consulting project for hire , a marketing effort, a job that has manufacturing elements or just about any endeavor that may need to be linked to any number of clients, events, vendors, e-mails or finance transactions.

A campaign has the basic information fields such as its name, type, status and priority. As with most form view of InBizness modules, there is a fair amount of tab panels that allows you to see more details about a particular aspect of that module.


This is a form view of each campaign record. It is currently broken into six different sections. These are Campaign Details, Campaign Comments, Billable Campaign Details, Campaign Operation Buttons, Events For The Campaign and Linked Clients To The Campaign.

BILLABLE CAMPAIGN TRACKING

In some cases, I use a campaign to track client projects. That is to say a customer may call me and want me to work on their FileMaker database. I work up a quote and they purchase a block of hours. I then create a campaign for that project. In this area, I put in the client id for the person that is the billable contact for the project. The contact, email and phone number is viewed via the linking of the client id.

I then fill in the hourly rate and the amount paid fields. I do require that all projects / campaigns be paid in full before starting a project. For very large projects, I break the projects into smaller milestones and create a campaign record for each.

The amount due, total hours and hours remaining fields are calculation fields. When I work on this project, I click a button on the campaign record to create a new event. The linked event then records the time that I spent on the project and calculates the amount of money spent for that event session. The sum total of all events is used to calculate the amount due and hours remaining fields. The total hours field is the amount paid divided by the hourly rate.

Now you can adjust the hourly rate on new events and even perform events that have no charge to the client.

CAMPAIGN EVENTS TAB PANEL
As I mentioned, a campaign is likely to have many events attached to it. There is a tab panel dedicated for related events and I placed a number of portals that allow you to see the most recent linked events. There is a magnifying glass icon next to each event to quickly view its information. You can also click the red text of View As List, to see the entire list of related events. This button will take you away from the campaign table and to the events table.

Key Features Of The Campaigns Module
- Ability to link to multiple modules
- Ability to assign multiple events to a campaign
- Ability to link to multiple media files
=
More info about the author and FileMaker in general, contact me at info@dwaynewright.com.

© 2008 - Dwayne Wright - dwaynewright.com

The material on this document is offered AS IS. There is NO REPRESENTATION OR WARRANTY, expressed or implied, nor does any other contributor to this document. WARRANTIES OF MERCHANT ABILITY AND FITNESS FOR A PARTICULAR PURPOSE ARE EXPRESSLY DISCLAIMED. Consequential and incidental damages are expressly excluded. FileMaker Pro is the registered trademark of FileMaker Inc.

Thursday, April 24, 2008

Introduction To The Events Module

From Dwayne Wright - Certified FileMaker 9 Developer
www.dwaynewright.com
info@dwaynewright.com
TWITTER: dwaynewright

The Events Module is filled with records that generally come from other modules. For example, you can create a new event from the clients module for a new meeting, call or to do event. The same is for a campaign record. I tend to log all my program for a customer from a campaign. This means I can even keep track of billable hours this way!

Single Event View - This is a form view of each event record.

Daily - This is calendar view of your events on a daily basis. You have arrow keys that allow you to navigate from one days events to the next days events.

Weekly - This is calendar view of your events on a weekly basis. You have arrow keys that allow you to navigate from one weeks events to the next weeks events.

Monthly - This is calendar view of your events on a monthly basis. You have arrow keys that allow you to navigate from one months events to the next months events.

Range - This is calendar view of your events via a set range of dates. You specify a start date and an end date and you will see all the events between those two dates.

The single event view for a particular event.

The Event Record Information screen holds all the details of an event. Each event has a title, so that it can be easily recognized in lists. The type field is attached to a value list menu, to allow you to quickly make choices. This is something you can customize for your own needs. At the moment that I’m writing this, it has the possible choices of Client Project, Design Project, Guide, Marketing, Product Announcement and Special Offer. These are the types that I want to keep track of and perhaps report upon. I didn’t create a field for event classes like calls, meetings and to do events. There is little reason for me to track this in my business and I can put information like that in the event title. However, you may want to add an event class field in your version.

The purpose of the event date and duration are pretty self evident. I put in a reminder date field but at this time have not built a script to automatically generate future events. Depending on how complex you would want your reminders programed, it can be very easy or very difficult to design.

I also like to link my events to a campaign and/or a client. This is why those fields are there. The data in these fields is generally added from that module automatically. Say if you are on a client record, you can click a button to add a new event for that client. This creates a record in the event table and automatically places the client id information in that field. The same is true if you are on a campaign record.

Finally, you can make an event billable. I do this all the time because consulting, technical support and custom design are large parts of my business. The way that I do it is setup a campaign with a customer that purchases a block of design time. After working on a project, I go to that campaign record and record the programming time as an event. Then I can simply enter in the duration and the billable hourly rate. The programming time is automatically calculated and then deducted from the time block purchased by the client.

The Event Interaction buttons are shortcuts for the rare occasion that you would create a new record within the event module. They allow you to duplicate a current record and then you can edit it as needed. I only used these buttons when I was working with legacy data from another system. Then it was easier to duplicate events and change the affected information.

The Linked Contact information consists of related fields from the client module. When the client id field has data that matches a client record, you can see their address information. If you edit this data here, you are actually modifying the actual client record.

This is the daily view of events.

The screens in the Events module are solution wide and not filtered by a particular staff member but this is fully customizable for registered owners.

Key Features Of The Events Module
- Ability to link to multiple modules
- Ability to duplicate and clone events
- Auto link new events to logged in staff member
=
More info about the author and FileMaker in general, contact me at info@dwaynewright.com.

© 2008 - Dwayne Wright - dwaynewright.com

The material on this document is offered AS IS. There is NO REPRESENTATION OR WARRANTY, expressed or implied, nor does any other contributor to this document. WARRANTIES OF MERCHANT ABILITY AND FITNESS FOR A PARTICULAR PURPOSE ARE EXPRESSLY DISCLAIMED. Consequential and incidental damages are expressly excluded. FileMaker Pro is the registered trademark of FileMaker Inc.

Wednesday, April 23, 2008

Introduction To The Inventory Module

From Dwayne Wright - Certified FileMaker 9 Developer
www.dwaynewright.com
info@dwaynewright.com
TWITTER: dwaynewright

The Inventory Module is used to list all the products or services that you will sell on an invoice.

It has a number of features including ..

- two level pricing capabilities
- auto deduct inventory from invoice sales
- auto increment inventory from purchase order receiving updates
- calculate reorder amounts
- flag records to be included (not included) in value lists for invoices / purchases
- ability to see invoice sale transactions
- ability to see purchase order transactions
- ability to see purchase order received sale transactions
- ability to see and add inventory adjustment transactions
- ability to see client sales history
- ability to record basic e-store information
=
More info about the author and FileMaker in general, contact me at info@dwaynewright.com.

© 2008 - Dwayne Wright - dwaynewright.com

The material on this document is offered AS IS. There is NO REPRESENTATION OR WARRANTY, expressed or implied, nor does any other contributor to this document. WARRANTIES OF MERCHANT ABILITY AND FITNESS FOR A PARTICULAR PURPOSE ARE EXPRESSLY DISCLAIMED. Consequential and incidental damages are expressly excluded. FileMaker Pro is the registered trademark of FileMaker Inc.

Introduction To The Invoices Module

From Dwayne Wright - Certified FileMaker 9 Developer
www.dwaynewright.com
info@dwaynewright.com
TWITTER: dwaynewright

The Invoices module is where you enter in sales transactions to clients. Actually, it is one of the more direct and easy to master modules within InBizness SOHO.

Although you can create invoices in the invoice module, most users will create them from a client record. This way you can be sure that the invoice is linked to a client for reporting and accurate client invoice history.

The shipping fields that you see on an invoice record and on a printed invoice are stored in the client module but you can add a drop ship address on the invoice. The billing information is copied over from the client record and is editable on the invoice.

The Line Entry or Text Entry tab can be where you add all the various products and services that were sold to a customer on one invoice transaction. This information is not stored in the invoice table but in another table called inventory sales. For all practical purposes, this is invoice information but using a link to this table allows us to have an almost unlimited number of products on an invoice (and if this is your situation ... good for you ) and it allows us to automatically deduct sold products from our inventory table. The key element in the product order portal is the product id field. When you click into this value list, you will see all the possible products that you can sell on an invoice. Again, to beat an already buried horse, this system was designed by me for me. So you might have way too may products to support this function. Again, this is something that can be modified by those that purchase this solution. It would not be hard to build filters and pop up windows for the quick and accurate entry of sold items.

When a product id is entered, the description, price and classification information is automatically brought in from the inventory table. The portal is setup to accept new records by navigating to the last empty row and then click within the Product ID field. There is a capability to have two level pricing for a client or on a line item and that pricing is pulled from the inventory module.

There is also an area that allows you to see and add to the overall totals of an invoice. The Sub Total field calculates automatically. You can manually enter in shipping and sales tax totals that will be combined with the sub total field to reach the calculated grand total. You can make the shipping and sales tax fields automated using FileMaker design for relationships and scripting.

There are a few buttons that are unique to the invoice screen and I’d like to cover them here. Three of these buttons are dedicated to the output of an invoice and the other allows you to jump to the client record of an invoice.


View Related Client - As I mentioned earlier, all invoices are designed to be linked to a client record. This is done when the client id information matches between a record in the client module and a record in the invoice module. This button allows you to go directly to that client record in the clients tab to see additional client information that you cannot see here.

Print Invoice - allows you to print an invoice of the record you are viewing. The printed invoice can allow you to specify payment and return instructions. I did not provide that by default because my business is primarily credit card internet based.

Email Invoice - this is how I deliver 90% of my invoices. Clicking this button allows me to quickly send a customer an invoice and allows you to include attachments. I deliver the majority of my products as email attachments, so this system is geared towards that process.

Email Invoice Multiple - this function allows you to generate multiple copies of an email invoice. You might want to do this for a number of reasons. One of the primary reasons I do it is if I need to send many enclosures. I will generate a number of invoices and attach one enclosure to each. It is also handy if you need to resend an invoice. This button only sends the email invoice and not the notification letter that the Email Invoice button sends.

Key Features Of The Invoices Module
- Ability to sell products and services
- Ability to email out invoices
- Ability to link invoices to staff time cards
- Ability to link invoices to media files
- Ability to apply multiple payments to an invoice
- Ability to duplicate an invoice with line items
=
More info about the author and FileMaker in general, contact me at info@dwaynewright.com.

© 2008 - Dwayne Wright - dwaynewright.com

The material on this document is offered AS IS. There is NO REPRESENTATION OR WARRANTY, expressed or implied, nor does any other contributor to this document. WARRANTIES OF MERCHANT ABILITY AND FITNESS FOR A PARTICULAR PURPOSE ARE EXPRESSLY DISCLAIMED. Consequential and incidental damages are expressly excluded. FileMaker Pro is the registered trademark of FileMaker Inc.

Introducing The Clients Module

From Dwayne Wright - Certified FileMaker 9 Developer
www.dwaynewright.com
info@dwaynewright.com
TWITTER: dwaynewright

The Clients module is a major module in InBizness SOHO. A client record can be linked to almost every other module within the system. For example, a client record can be linked to an invoice record, an activity record, a purchased item, a campaign and even stored files like pdf files or excel spreadsheets.


There are a number of buttons in a dark gray area to allow for client record navigation, new record creation, deletion of client records, searches, printing and more. Below the dark gray area are lighter gray buttons that will create new records in other modules and link them to the current client record.

Currently, the clients module is broken into three main tab panels with two at the top and a large panel running along the bottom. The top left tab panel allows you to see client address information, default payment settings for invoices and an overview for related records. The top right tab panel currently has just one tab for listing alternate phone numbers for the client. The bottom tab panel shows a wealth of information and is broken up into multiple tabs. Many of these tabs will have tab panels within them for nested tab capability.

Key Features Of The Clients Module
- Ability to link to multiple modules
- Ability to set default payment methods
- Ability to see multiple linked aspects of Sales / Marketing
- Ability to see multiple linked aspects of Customer Satisfaction
- Ability to see multiple linked aspects of Events and Emails
- Ability to see multiple linked staff timecards
- Ability to see multiple linked media file records
- Ability to see linked web site information
- Limited data auditing on record changes
- Multiple client related report activities
=
More info about the author and FileMaker in general, contact me at info@dwaynewright.com.

© 2008 - Dwayne Wright - dwaynewright.com

The material on this document is offered AS IS. There is NO REPRESENTATION OR WARRANTY, expressed or implied, nor does any other contributor to this document. WARRANTIES OF MERCHANT ABILITY AND FITNESS FOR A PARTICULAR PURPOSE ARE EXPRESSLY DISCLAIMED. Consequential and incidental damages are expressly excluded. FileMaker Pro is the registered trademark of FileMaker Inc.

About The Main Screens

From Dwayne Wright - Certified FileMaker 9 Developer
www.dwaynewright.com
info@dwaynewright.com
TWITTER: dwaynewright

The main screen is a central place to find information or access different areas of InBizness SOHO. This area will likely be limited because it will be a place that someone will want to customize for their own needs.

As of version 2.3, the main screen is broken down into 5 main tabs and has a button bar to the right to jump to main InBizness module.


THE ABOUT TAB
Tells you a little bit about the program and welcome the first time user.

THE VERSION HISTORY TAB
Allows you to quickly see how the product is evolving and helps you keep abreast of the directions it is going.

THE PREFERENCES TAB
A general area that allows you to set the unique information your company may be using like the default shipping address for purchased products.

THE LICENSE TAB
The agreement on how InBizness SOHO can be used and distributed.

THE ACKNOWLEDGMENTS TAB
One big advantage in creating databases with FileMaker Pro is the community of developers and how they openly share tools to make better databases. This is an area where I try to acknowledge those that helped make each update of InBizness SOHO possible.
=
More info about the author and FileMaker in general, contact me at info@dwaynewright.com.

© 2008 - Dwayne Wright - dwaynewright.com

The material on this document is offered AS IS. There is NO REPRESENTATION OR WARRANTY, expressed or implied, nor does any other contributor to this document. WARRANTIES OF MERCHANT ABILITY AND FITNESS FOR A PARTICULAR PURPOSE ARE EXPRESSLY DISCLAIMED. Consequential and incidental damages are expressly excluded. FileMaker Pro is the registered trademark of FileMaker Inc.

Top Productivity Features Of InBizness SOHO

From Dwayne Wright - Certified FileMaker 9 Developer
www.dwaynewright.com
info@dwaynewright.com
TWITTER: dwaynewright

Most of the top productivity features of InBizness SOHO come from the fact that it originates from a great database product called FileMaker Pro. FileMaker Pro is a robust database product that excels at the linking from one table to the next. The linking consists of relationships where one table has a key data element in common with another table. However, it also includes linking based upon scripts that perform actions, value lists that provide data entry options and screens that easily navigate this sea of information.

With InBizness SOHO, you can:

Organize all business relevant information in one place.

View client information, linked incoming and outgoing e-mails, view linked activities ( calls, meetings, to do ), view related purchases and even view related files such as pdf documents, excel spreadsheets, word documents and more!

Easily create new invoices for print out or delivery via email!

Automatically keep track of inventory levels and see product sales history at a glance!

View events that are related to a client, vendor or even campaign in a daily, weekly, monthly or range view!

Create campaigns for both client and internal projects. Each campaign can be linked to events, clients, products and even e-mails!

Create multiple windows at will to construct a personalized work environment.

Make use of InBizness SOHOs robust reporting engine. This allows you to run reports across any single or multiple tables within the file!

Network the entire solution to anyone in the office that is running a compatible copy of FileMaker Pro!
=
More info about the author and FileMaker in general, contact me at info@dwaynewright.com.

© 2008 - Dwayne Wright - dwaynewright.com

The material on this document is offered AS IS. There is NO REPRESENTATION OR WARRANTY, expressed or implied, nor does any other contributor to this document. WARRANTIES OF MERCHANT ABILITY AND FITNESS FOR A PARTICULAR PURPOSE ARE EXPRESSLY DISCLAIMED. Consequential and incidental damages are expressly excluded. FileMaker Pro is the registered trademark of FileMaker Inc.

Navigation Basics For InBizness SOHO

From Dwayne Wright - Certified FileMaker 9 Developer
www.dwaynewright.com
info@dwaynewright.com
TWITTER: dwaynewright

There are of methods to navigate within InBizness SOHO and these options actually help lay down a navigation grid. Once you get the hang of it ( and that shouldn’t take too long ), you may begin to wonder why all FileMaker databases are not designed like this.

The first method is the navigation menu that can be found at the top of each module. This utilizes a feature in FileMaker Advanced called custom menus. After you purchase your copy of InBizness SOHO, you can add or delete options from this menu and it will be updated where ever the Navigation menu appears.

The second navigation method is linked to each module and these tools look like tabs that you would find inside of a file cabinet. These tabs take you to different layers on the current layout and are a fantastic feature that was introduced with FileMaker version 8.

A third navigation method is the magnifying glass icon. You will generally find this icon next to records in list view, records in a portal row or next to a related field. Clicking this button will take you to the record it is sitting next to.

The fourth and last navigation method are just regular buttons that tend to allow you to quickly create a new related record for another module. For example, you can find buttons in the Client module to create new related invoices, quotes and proposals. When you click those buttons, it will take you to that module, create a new record and link it to the client record you were on at the time.


=
More info about the author and FileMaker in general, contact me at info@dwaynewright.com.

© 2008 - Dwayne Wright - dwaynewright.com

The material on this document is offered AS IS. There is NO REPRESENTATION OR WARRANTY, expressed or implied, nor does any other contributor to this document. WARRANTIES OF MERCHANT ABILITY AND FITNESS FOR A PARTICULAR PURPOSE ARE EXPRESSLY DISCLAIMED. Consequential and incidental damages are expressly excluded. FileMaker Pro is the registered trademark of FileMaker Inc.

Brief History Of InBizness SOHO!

From Dwayne Wright - Certified FileMaker 9 Developer
www.dwaynewright.com
info@dwaynewright.com
TWITTER: dwaynewright

InBizness has been around a long time, in fact, the original version was released back in 1992 and was created with FileMaker Pro 2.0 v3. Back then, my company was called, LeSaux Media Services. InBizness has been updated many times and this is the current version that supports many of the new feature in FileMaker Pro 9.


This version of InBizness (called SOHO), was originally designed for the single person, home office professional.When FileMaker 7 was released, I rewrote InBizness SOHO from scratch. This was before there were any migration tools from FileMaker 6 to FileMaker 7. I designed this variation to support my consulting business from 2000 to 2005, in which I ran the entire business from an office upstairs of my house and I sold FileMaker products to customers all across the United States, all across Europe, Australia, Japan, South Africa and many more remote locations on this large spinning marble we earthlings call home.

Since I didn’t have any migration tools at the time and I didn’t need modules such as purchase orders, vendor bills, credit memos and the like ... these modules were not included within the InBizness SOHO code. In 2008, all these modules will be restored and more.

=
More info about the author and FileMaker in general, contact me at info@dwaynewright.com.

© 2008 - Dwayne Wright - dwaynewright.com

The material on this document is offered AS IS. There is NO REPRESENTATION OR WARRANTY, expressed or implied, nor does any other contributor to this document. WARRANTIES OF MERCHANT ABILITY AND FITNESS FOR A PARTICULAR PURPOSE ARE EXPRESSLY DISCLAIMED. Consequential and incidental damages are expressly excluded. FileMaker Pro is the registered trademark of FileMaker Inc.

Saturday, April 19, 2008

Creating A Sub-Summary Report For InBizness SOHO

From Dwayne Wright
Certified FileMaker 9 Developer
www.dwaynewright.com
info@dwaynewright.com

Here is a step by step description of creating a report that has a sub-summary breakdown feature. While I am writing this content, I’m going to add a new report to the 2.3 version of my InBizness SOHO product. I want to see a breakdown of client records by the state they reside within. I want to see a report total of each clients activity within the solution. I have to admit, I almost never use the report assistant to create my reports. I tend to create them from blank layouts or duplicate/tweak an existing report for my needs. However, that will be an article for another time.

Step 1 - Before we get started, you will want to work with an off-line backup copy of your database, make sure you have the fields you need for the report and possibly clean your data.

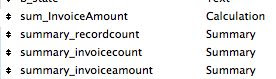
As odd as it may sound, you need to make sure you have the fields created you want to use in your report. Otherwise, you will need to cancel the report, create the fields and then come back again. So in the report that I’m going to create, I need to have the billing state information and the summary total fields I’m going to report upon. Another thing you can do help yourself out is clean your data. As I was typing this, I realized the example data I had in SOHO may have empty fields in the billing address, so I did some targeted finds and cleaned up the data.

Step 2 - Next we need to put FileMaker into layout mode. When you enter into layout mode, you will notice that you now have a Layout menu option. From here, select to create a new layout by selecting the first option of New Layout / Report. In the following dialog box, give your report a name, select the Columnar list / report option and click the Next button.

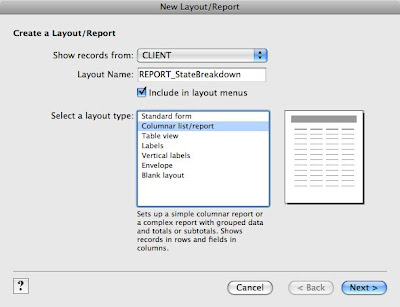
Figure 1: Be sure to check the second option of Columnar List / Report

Step 3 - The next window in the assistant allows you to create a simple list or a report with grouped data. The grouped data option uses the sub-summary layout part that we discussed briefly earlier. This is the option we want to select. So from here, select the second option of Report With Grouped Data. There are two options to this setting. The Include Subtotals is used to allow you to see totals by the break field. For example, we are going to use the State field as our break field in this example. So we will need to sort by this field and then the layout will show us the totals for each state. The next option is to Include Grand Totals. We will want to select this option as well.

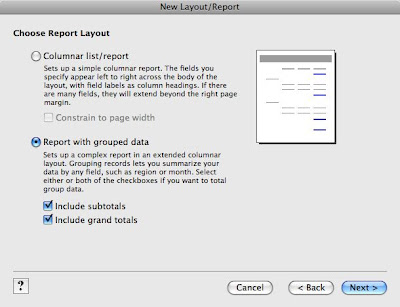
Figure 2: Here are the settings I selected for my report.

Step 4 - The next window in the assistant allows you to specify the fields you want in the layout. You can select the fields you want from the list on the left, click the move button and the field will appear in the list on the right. The list on the right reflects the fields that will be on the layout in the order they will appear. You can move these fields up and down in the list to change the order in which they will appear. We should also mention that you can use fields from a valid relationship as well in this layout. The related fields can be found from the pop down menu right about the left hand list.

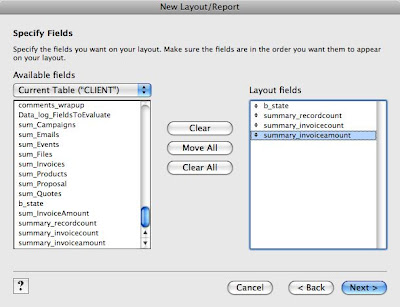
Figure 3: Here are the settings I selected for my report.

Step 5 - The next window will allow you to choose what field you want to group the data with. This is our break field, which is also how the found set will need to be sorted. You can have multiple fields for the break field but the more you add ... the more busy the report will appear. Some folks love busy reports with data sliced and diced ten different ways to Sunday. Other folks find busy reports confusing and lacking a particular focus.

For our example, we are only going to include the State field.

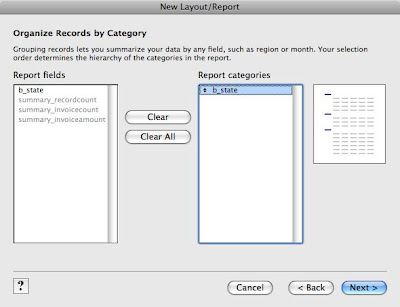
Figure 4: Here are the settings I selected for my report.

Step 6 - The next window will allow you to choose a sort order for the report. This is critical for sub-summary reports and is best attached to a script. FileMaker will not sort a found set of record by simply going to a particular layout. Since our break field is the State field, we are going to specify it as the primary sort field. You can have other sorts after your break field setting. This will simply sort the records in the Body layout part.

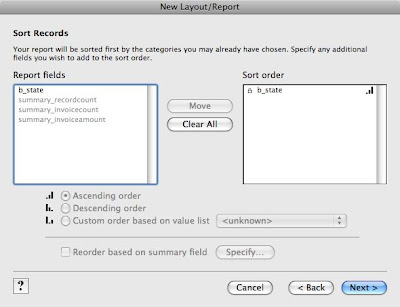
Figure 5: Here are the settings I selected for my report.

Step 7 - The next window is used for you to specify your subtotal fields. This is where our summary field will play a part. The dialog box has 3 pop down menus at the top. The first allows you to select the field for the summary part. The second will show the field you want to summarize by and the last option is were you want the sub-summary to appear ( above or below the body of records it summaries). After you have made your selections, you click the button Add Subtotal for it to be recorded in the section below these settings.

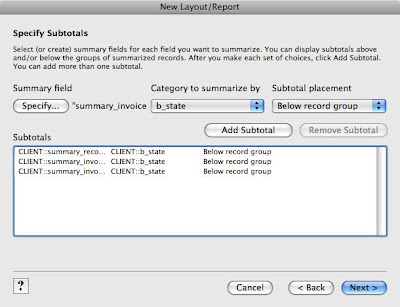
Figure 6: Here are the settings I selected for my report.

Step 8 - The next window is used for you to specify your grand total section. FileMaker will do a pretty good job of assuming what you want here. Odd as it may sound, I’ve never seen this dialog until now. I’m going to take a shot at the settings that seem to make sense and rely on my ability to tweak this as needed after the fact.

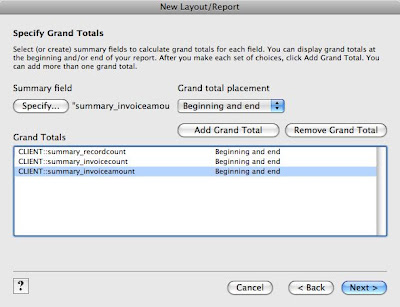
Figure 7: Here are the settings I selected for my report.

Step 9 - The next window is used for you to choose one of the provided FileMaker themes. Some of these themes may seem to be a little odd to you and not that business like. However, it should be noted that some of these themes look great when used with the Instant Publishing. I tend to select the most plain theme because I want to customize it for my needs.

Step 10 - The next window is very cool. It allows you to show information in the header and / or the footer that tell the user something about the list / report. Some of this information can be seen when you are viewing the layout in browse mode and some of it can only be seen when in print preview or when printed out.

Again, I’m going to understate my needs here and tweak it afterwards, I’m going to add the name of the report of the upper left, the current date in the upper right and the page number in the bottom right.

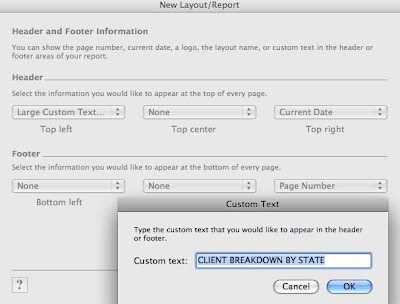
Figure 8: Here are the settings I selected for my report.

Step 11 - The next window allows you to create a script on the fly for going to this layout. This can be very useful for complicated reports that have multiple steps. The script that is automatically created for you is very basic. I am not going to create a report at this time. Many of my reports are gathered into one script and broken up by a script parameter. This is more of a helper option and will not affect your report overall.

Step 12 - The final step asks you what mode you want to be in when the assistant ends. You can be in preview mode for those complicated reports using sub-summary parts. However, most of the time you will want to be in layout mode. This allows you to add any customizations you want on the newly created report.

Step 13 - I decided to see my report in layout mode and it is not even close to what I want. However, I can tweak it to meet my needs.

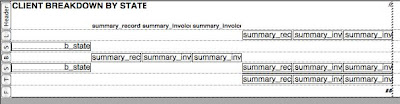
Figure 9: Here is what I got when I got into layout mode for this report.

Step 14 - So I obviously made selections in the report assistant process that I did not want to make. This happens and I thought it was important to share this with you. This happens and it is no big deal because I will tweak the report. Here are the tweaks I made ...

- deleted the first leading grand summary layout part

- moved the summary fields from the body up to the sub-summary part

- deleted the body and the sub-summary part following it

- moved the summary fields so they were below each other

- by default, FileMaker labels the fields with the field names and I changed those labels to make more sense on the report.

- made the report total fields aligned to the right, made the invoice total a number format field, tweaked the footer part for display

Figure 10: Although I will tweak it more over time, here is what the layout looked like when the above tweaks were complete.

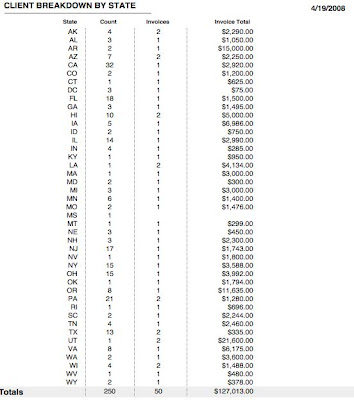
Figure 11: Here is a quick look at the browse view of the created report.
=
More info about the author and FileMaker in general, contact me at info@dwaynewright.com.

© 2008 - Dwayne Wright - dwaynewright.com

The material on this document is offered AS IS. There is NO REPRESENTATION OR WARRANTY, expressed or implied, nor does any other contributor to this document. WARRANTIES OF MERCHANT ABILITY AND FITNESS FOR A PARTICULAR PURPOSE ARE EXPRESSLY DISCLAIMED. Consequential and incidental damages are expressly excluded. FileMaker Pro is the registered trademark of FileMaker Inc.

Thursday, April 10, 2008

FILEMAKER: Sample Proposal From InBizness SOHO 2.3

From Dwayne Wright
Certified FileMaker 9 Developer
www.dwaynewright.com
info@dwaynewright.com

This is an example proposal that was built via a single click. The idea is that you can do data entry in the proposal module and click a button to combine that content into a single document. Having multiple proposals with slightly different variations is a snap!

----------------------------
Thank you for this opportunity to submit this proposal and develop a long term business relationship with Example Company.

The purpose of this letter is to present a proposal for the construction of a new, centralized database system discussed via email with Mark (the consultant) and our meeting in your office last week. Please keep in mind that this is a "first pass" proposal and I welcome your feedback, ideas and suggestions. Thank you for this opportunity to submit this proposal and develop a long term business relationship with Example Company.

The purpose of this letter is to present a proposal for the construction of a new, centralized database system discussed via email with Mark (the consultant) and our meeting in your office last week. Please keep in mind that this is a "first pass" proposal and I welcome your feedback, ideas and suggestions.

BACKGROUND
Mark (the consultant) is doing network consulting for Example Company, contacted me about FileMaker 6 conversion information. After discussing the various aspects of these conversions, Mark invited me to discuss a conversion project for Example Company.

Although the company is a satisfied FileMaker customer, one primary division of the company is running on a FileMaker 7 solution and another major division is running on an older but still functioning FileMaker 5 solution. Mark was hoping that we could propose integrating the two systems under a unified FileMaker 9 server. There are concerns regarding budget and the smooth integration of the two systems.

We scheduled an onsite visit on March 12th and I had a brief visit with CEO Jon Doe. He explained that the FileMaker 7 solution was built to upgrade the FileMaker 5 solution for both the Sales and Resolution departments. Later I was able to meet with George Resolution, the Resolution Manager and the department that is using the FileMaker 5 solution.

The FileMaker 5 solution seems quite solid and much of the logic would work admirably under a FileMaker 9 solution. Mr. Resolution showed me his concerns about the FileMaker 7 solution that the sales department is using. Most of these concerns can be alleviated by creating a layout for each department but use the same source data table. I showed Mr. Resolution a few examples and he became very excited about the opportunities. I further explained that layouts can be department specific or even user specific and still use the same source data. We can even have customized buttons that appears on those individual layouts so the actions would be department / user specific.

We also discussed how painful a proposed integration may be for the workplace. I proposed a staged implementation and keep a healthy balance between new features and office reeducation on the use of the database.

OBJECTIVES
In this phase, I recommend determining the requirements, organizing a project plan and the preparation of a prototype solution for the integration of the two databases. Since the sales department database is the more modern version, I would propose looking at integrating the Resolution Department layouts, fields, scripts and security into the Resolution file. The typical challenges in a FileMaker conversion revolve around data and security. In this case, we will also be adding the resolution department screens and the navigation for those users.

Another objective will be to define future needs. There is a lot of power and flexibility to be gained from FileMaker 9. So I would suggest a set of future meetings in which I learn more about Example Company business workflow and share with management opportunities the new system can provide. I suggest a long term and incremental approach to updating the database. This allows new features to be budgeted based on their return to the users and minimizes the amount of disruption in the workplace.

RESEARCH
At the time of this proposal, I haven't done any research on the databases themselves. This is do to the sensitive nature of the databases and the data within them. So this proposal is very conceptional at this point in time.

ABOUT TASKS
These milestones are very conceptual and can vary. Some of this can be done "in house" and significantly reduce the overall costs.

MILESTONES
These milestones are very conceptual and can vary. Some of this can be done "in house" and significantly reduce the overall costs.

DEFINE AND DOCUMENT PROJECT REQUIREMENTS
We feel that it is important to have a document that clearly defines what the end result will be for this phase. This allows us to better research the potential risks we may have to address later on in the project. We will also want to have a business case identified that we can identify the ROI and help the project stay on track long term.
HOURLY RATE: $ 75.00
ESTIMATED TIME TO COMPLETE: 2 to 4 hours.
ESTIMATED INVESTMENT: $ 150.00 to $ 300.00


IDENTIFY PROJECT TEAM / GET SIGNOFF
It is important to pick a set of team members in the work group to identify needs, test the solution and provide feedback. After each team member is identified, then we should get sign off from each one the the project mission statement is correct.
HOURLY RATE: $ 75.00
ESTIMATED TIME TO COMPLETE: 1 to 3 hours.
ESTIMATED INVESTMENT: $ 75.00 to $ 225.00


USER INTERFACE MEETING / SIGN OFF
Having the project team agree on a user interface is very important and should be established as early in the process as possible. I will start by showing a number of template interfaces, gather feedback and agree upon a user interface for sign off.
HOURLY RATE: $ 75.00
ESTIMATED TIME TO COMPLETE: 1 to 5 hours.
ESTIMATED INVESTMENT: $ 75.00 to $ 375.00


END USER INTERVIEWS
Part of this milestone is predicated by what is uncovered in the earlier milestones and how the interviews go. What we do is visit relative staff members to see what the current database does and what they like / dislike about it. The interviews are recorded via screen capture software and can be reviewed by other project members or as work on the new database progresses.
HOURLY RATE: $ 75.00
ESTIMATED TIME TO COMPLETE: 4 to 20 hours.
ESTIMATED INVESTMENT: $ 300.00 to $ 1,500.00


CLEAN UP OF LEGACY DATA
Looking at all the fields in all the current database that do not need to be migrated to the new system and removing them from the current database.
HOURLY RATE: $ 75.00
ESTIMATED TIME TO COMPLETE: 3 to 8 hours.
ESTIMATED INVESTMENT: $ 225.00 to $ 600.00


THIRD PARTY INTEGRATION
Review of any integration needs (like Quickbooks integration) and outline how those integration's will take place.
HOURLY RATE: $ 75.00
ESTIMATED TIME TO COMPLETE: 1 to 3 hours.
ESTIMATED INVESTMENT: $ 75.00 to $ 225.00


IDENTIFY QA NEEDS
Identify when quality testing needs to be done on the prototype solution and who will be performing these tests.
HOURLY RATE: $ 75.00
ESTIMATED TIME TO COMPLETE: 2 to 3 hours.
ESTIMATED INVESTMENT: $ 150.00 to $ 225.00


MILESTONES TOTALS
Low Estimate 14 hours at investment of $ 1,050.00
High Estimate 46 hours at investment of $ 3,450.00

IN CLOSING
Thank you again for the opportunity to submit this proposal. I am very excited to get to work on the future of your database system for you. Please know that I welcome all of your feedback (both positive and negative) and consider it a crucial element in the long term success of your database solution.

So please do not hesitate to contact me any time I can be of assistance.

Sincerely,
Dwayne Wright
dwaynewright.com
Certified FileMaker 9 Developer
Certified FileMaker 8 Developer
=
More info about the author and FileMaker in general, contact me at info@dwaynewright.com.

© 2008 - Dwayne Wright - dwaynewright.com

The material on this document is offered AS IS. There is NO REPRESENTATION OR WARRANTY, expressed or implied, nor does any other contributor to this document. WARRANTIES OF MERCHANT ABILITY AND FITNESS FOR A PARTICULAR PURPOSE ARE EXPRESSLY DISCLAIMED. Consequential and incidental damages are expressly excluded. FileMaker Pro is the registered trademark of FileMaker Inc.

Tuesday, April 8, 2008

FILEMAKER: Current Examples Of Some Custom Functions I Use

From Dwayne Wright
Certified FileMaker 9 Developer
www.dwaynewright.com
info@dwaynewright.com

This is a listing of the current custom functions that are used within InBizness SOHO. None of these custom functions are original because there is such a wealth of complimentary custom functions out there. I wanted to take a moment to acknowledge these resources, thank the providers for them and point you to where these terrific resources are.


SUPERLOG
from NightWing Enterprises (http://www.nightwing.com.au/FileMaker/) part of the 747 collection
Allows each module to do basic auditing of selected FileMaker data entry fields. Found in almost all form views that are associated with major base tables such as clients, invoices, inventory, etc...

ADDDOLLARFORMAT
from briandunning.com (http://www.briandunning.com/cf/196 ) uploaded by Jeremiah Small of Soliant Consulting
This allows me to take number data and show it in proper dollar format in text strings like the emailing the text version of an invoice. You can see this custom function in fields like EMAIL_invoice in the invoice module or c_email_purchase in the Purchase order module.

CFTAB
from briandunning.com (http://www.briandunning.com/cf/570) uploaded by Michele Olson, AppleSauce Productions, Inc. but she acknowledges it came from the FileMaker 8 Desk Reference (another great resource)
This is used to add a tab character in text strings. You will find this used in the proposal module to indent the estimated hours and costs for project milestones.

CHECKTEXT
I guess I did create this custom function but the code was part of an example file gleaned from databasepros.com (http://www.databasepros.com/resources.html). I think there are a number of others at briandunning.com as well.
This takes a number and converts it into written text and this is used in the printing of checks from the Finance module. I did this back when FileMaker 7 was first introduced and it has been a part of InBizness SOHO since the beginning. I took the code from the example file and built a custom function out of it.

=
More info about the author and FileMaker in general, contact me at info@dwaynewright.com.

© 2008 - Dwayne Wright - dwaynewright.com

The material on this document is offered AS IS. There is NO REPRESENTATION OR WARRANTY, expressed or implied, nor does any other contributor to this document. WARRANTIES OF MERCHANT ABILITY AND FITNESS FOR A PARTICULAR PURPOSE ARE EXPRESSLY DISCLAIMED. Consequential and incidental damages are expressly excluded. FileMaker Pro is the registered trademark of FileMaker Inc.

====================== ADVERTISEMENT ==============================
For more information on the Virtual One On One Training, please visit http://www.dwaynewright.com/training.html
===================================================================

Thursday, April 3, 2008

InBizness SOHO Version 2.२ Update

3/15/2008 - InBizness SOHO Version 2.2
This update has a number of minor tweaks in order to better support FileMaker 9 features.

FILEMAKER 9 SUPPORT CHANGES

LAYOUTS - All main form view layouts have been updated to take advantage of screen resize features

LAYOUTS - All form view layout tab panels have been changed to full justification and squared appearance

SCRIPTS - Added the new grouping feature to allow developers to better organize scripts


NEW STAFF MODULE

Added new staff module as a gateway for additional user feature sets

Added routine to place the staff members id as a global variable on startup

Added a child match field to all tables for the possibility to link to a staff record

Setup all staff match fields in all tables to auto enter global variable information

Setup method for adding and editing security accounts from a security record

Security updates send emails to email address in the preferences area

Added tab panels for equipment and software along with associated interactions

MISC OTHER CHANGES
MAIN - added global fields for setting default company information to be used on invoices and correspondence

MAIN - added a preferences tab panel in the main screen

MAIN - added a tab panel for viewing version update history

CLIENTS - added a billing address email field
CLIENTS - added the price level field for two level pricing for invoices

INVOICE - updated the calc field for email invoices to use the LIST function

INVOICE - added a tab panel to see the text version of the email invoice

INVOICE - added the ability to do two level pricing for invoices

BUDGET - deleted this table and associated logic, it wasn't a clean fit or needed by the other modules

EMAIL - dialog box for creating emails now has a tab panel

EVENT - dialog box for creating events now has a tab panel

TAXES - had the ability to export records that are tax specific to a different table, this never really worked the way I imagined it, so I deleted the table and associated logic

RELATIONSHIP GRAPH - InBizness SOHO has been using anchor / buoy for quite some time. In this update, I made tweaks to the naming convention for objects on the relationship graph. In short, all buoy objects will have the naming convention of anchor_BUOY__comment. So the name of the anchor will appear first in lowercase, underscore character, BUOY NAME IN UPPERCASE, (optional dual underscore characters), (optional text that better describes the relationship).

PRIVILEGE SETS - Added the privilege sets of Owner, Manager, Admin, Sales, Data Entry, Customer Service and Information Tech. These are common business roles in a workplace and this allows us to integrate these roles with staff based security settings.